Fruit of the Lathe
Main menu:
A very special pen
In the fall of 2012, I received an exciting invitation from a good friend: he wondered if I could make a fountain pen for him using Honduras Rosewood burl, with solid Sterling silver components.
This was the second time Leo had asked me to make a pen for him. The first time, he'd supplied me with the wooden blank - I'd never heard of Honduras Rosewood burl prior to receiving this in the mail, and it was an eye-opener ... somehow, he'd found out about this beautiful variety of wood and had tracked down a piece that was classified as "exhibition grade".
It was simply stunning. The pen I made from it was a normal "twist action" ballpoint that was going to look great no matter what I did to it, provided I managed to avoid any major errors during the pen-making process. (I was so relieved at having finished the pen without breaking anything that I got the address wrong and mailed it to a total stranger, but he was honest and delivered it to the place I should have sent it in the first place!)
It was an invitation I couldn't turn down. I'd already made a few fountain pens, and knew of a source for the Sterling silver components - Silver Pen Parts - from some other components and tools I'd purchased.
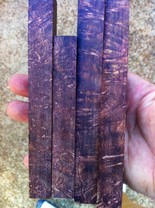
Getting wood of the quality to do justice to such fine components was more challenging, and it took several attempts before I finally managed to get four pieces with the exciting figure and grain I wanted.
Although buying four blanks to make one pen might seem like overkill, I'd had instances where the wood cracked during drilling, or crumbled while turning it on the lathe, and I wasn't going to take any chances: I wanted the extras "just in case ..."
Below: the blanks for this project
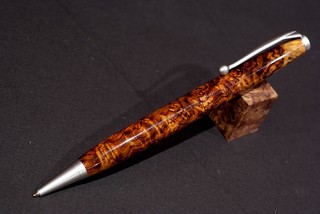
Above: The first time I encountered Honduras Rosewood burl - a ballpoint pen, also for Leo
Having found the wood, it was time to get some of the design parameters nailed down. Leo wanted this to be a large-barrelled pen, with plenty of weight (which was lucky, since the silver components aren't light!) and a high-quality medium-stroke nib. Mike at SilverPen Parts advised against making the cap postable (meaning it fits on the back end of the pen while you're writing with it), so we instead chose simple finials with recesses to accept a button of wood as the finishing touch.


With the components ordered, I was nearly ready to go ... just a couple of minor details, like buying drill bits the correct sizes for the pen barrel and cap (which required a 14.5mm bit, and there's one of those in everybody's toolkit, n'est-ce pas?)
I picked out the two best looking wooden blanks and marked them up before cutting on the bandsaw, then sliced them and drilled both cap and barrel pieces in readiness for gluing in the brass tubes that function as liners and add stability.
Above: the components from Silver Pen Parts
Below: the two blanks drilled, with brass tubes ready for glue-up

Above: drilling the cap blank on the lathe
Below: turning the barrel "between centers" with bushings

After letting the epoxy-resin glue cure fully, the ends of the barrels must be made truly square: even a few degrees off-square will result in (at best) unsightly gaps when the pen is assembled, or (at worst) the entire turning process being thrown off, giving oval instead of round sections.
Finally, it's time to put them on the lathe ...
With bushings in each end to act as guides, I turned the blanks first into cylinders, then gradually reduced the diameter until they measured just a few thousandths of an inch less than the silver component destined to mate into that end of the barrel.

After turning both barrel segments to the correct size, it was time to figure out how I was going to make the buttons to decorate the finials.
They were to be no more than a quarter inch deep to fit into the recesses milled in the silver finials, and even though I knew they were to be glued in place, I wanted the fit and finish to be perfect.
This took some thought. I elected to use a "waste block" to which I'd glue the piece of burl. This would let me turn it to size, and then sand, polish and apply the protective finish, before cutting it off the block and gluing it into the waiting finial.

Above: the cap finial on the lathe
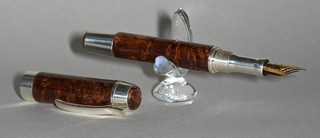
Finally, all the parts were coming together. The finials were made and glued in place. The barrels were sanded smooth and coated with protective cyano-acrylate finish (yes, regular superglue - a dozen or so coats, polished to a glass-like finish). After measuring and re-measuring with digital calipers to make absolutely sure there were no errors in the size, the silver components were buffed using jeweller's rouge, and (at last!) glued into the barrels.
The pen was finished ... and with the help of the Postal Service, it reached Leo in time for him to use when he signed the papers on his new home.

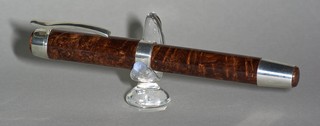
Above: test-fitting the the cap components

The finished pen ...